Can I copy process information from one item to another?
In this article, you'll learn how to 'clone' a process and apply the process details to multiple additional items. Cloning works similarly to the 'Save As' feature in many other apps.
Applicable Subscription Levels:
QC MANAGER | STARTER | PRO | PRO+ | ENTERPRISE
Overview
Cloning a process is similar to the Save As feature available in many applications. Cloning a process allows you to apply a completed process to additional items. Once applied, each cloned process can be tweaked before finally being saved and synced.
Topics in this article include:
Cloning a Process
- Complete a process
See the How do I complete a process in the Mobile Application? knowledge article for instructions - Before tapping DONE, check the Apply Process Details to More Items checkbox

- Click DONE
The screen displayed after clicking DONE will depend on the method used to create/generate the first Item
Continue by...
Cloning via Auto Generate
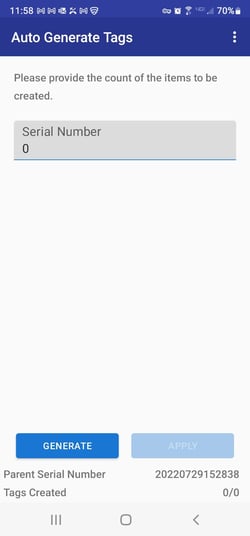
If the first item was created using the Auto Generate button, the Auto Generate Tags screen will appear

- Enter the count of additional Serial Numbers you would like to generate in the Serial Number field
- Tap GENERATE
The count of serial numbers will be generated
- If the count is incorrect, update the count and click REGENERATE
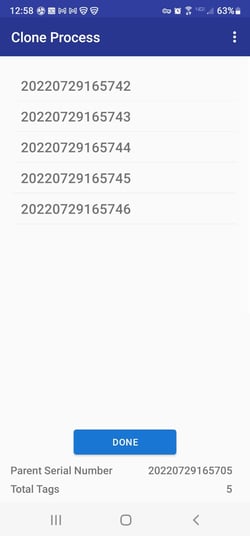
The serial numbers will be generated and a list displayed
.png?width=250&name=Clone%20Additional%20Process%20(2).png)
The original process has now been cloned and applied to the additional serial numbers. If any of the cloned processes need to be tweaked before saving & syncing, DO NOT TAP DONE. See the Editing Cloned Processes section of this article to make changes to each cloned process first.
Cloning via Scan Tag
- If the first item was created using the Scan Tag button, the Scan Tags screen will appear
- Use the onboard camera or connected external scanner to Scan the appropriate RFID, QR or Bar Codes to which you will like to apply the cloned process

The serial numbers list will be displayed

The original process has now been cloned and applied to the additional serial numbers. If any of the cloned processes need to be tweaked before saving & syncing, DO NOT TAP DONE. See the Editing Cloned Processes section of this article to make changes to each cloned process first.
Cloning via Form ID
- If the first item was created using the Form ID button, the Forms screen will appear

- Select the additional forms to which the cloned process should be applied
- Tap NEXT
The serial numbers generated for the selected Form IDs will be displayed
The original process has now been cloned and applied to the additional serial numbers. If any of the cloned processes need to be tweaked before saving & syncing, DO NOT TAP DONE. See the Editing Cloned Processes section of this article to make changes to each cloned process first.
Editing Cloned Processes
Once processes have been cloned, the list of serial numbers where cloned processes were applied will appear.

To edit one or more of the cloned processes before saving and syncing:
- Tap a serial number to edit the cloned process
The cloned process will open and will include the exact values entered on the first serial number
- Edit the cloned process as needed
Note that there will be no blue (required but incomplete) steps in this process - When finished editing, tap DONE
Note that cloned processes do not have a Finish Later option - The list of serial numbers will be displayed with a checkmark next to the item you just edited.

- Tap the next serial number where the cloned process needs tweaking
- Repeat steps 6-9 until all cloned processes that need tweaking have been updated
A checkmark will appear next to each item as they are updated
Note that not all cloned processes have to be touched. Cloned processes that are not updated will contain the exact same step values as the original process. - Tap DONE