![Idencia-Logos-White-2023.svg]](https://knowledge.idencia.com/hubfs/Idencia-Logos-White-2023.svg)
Overview
A Process is a series of Steps performed on a mobile device and used to collect information about a serialized item. Processes are built via your Idencia Aiden website, but can only be run on the Aiden mobile application.
Topics in this article will include:
Completing a Process
Understanding Step Types
Understanding Process Navigation - Buttons and Indicators
Cancelling a Process
Viewing Item Details
Process Execution Buttons
Process Completion Indicators
Completing a Process
Processes are configured in your Aiden website and are made up of varying Process Steps.
- You can begin a process on an Item by tapping Scan Tag, Auto Generate, or View List from the home screen to select a serial number.

- Once you've started a process, complete all Required Steps
Required steps will be highlighted in blue and the step name will include an asterisk (*). Once a valid value is entered, the step will turn white (or black if you are in dark mode).
NOTE: The Done button will not become available until all required steps are complete. - Complete all Optional Steps
Optional steps will be white.
- Verify that the appropriate data has been entered in all Process Phases
Each Process Phase will have it's own tab at the top of the screen. Depending on the Process configuration, the Phases may or may not have to be completed in order.
When Phases can be completed in any order, tap each phase name to move from phase to phase.
When Phases must be completed in order, tap the NEXT button to move from one Phase to the next. Note that tapping NEXT will start the next Phase and close the previous Phase. You cannot return to a previous, closed Phase when Phases must be completed in order.
If the process needs to be cloned, follow the instructions in the Cloning a Process in the Idencia Mobile Application knowledge article before tapping DONE. - Tap DONE
The DONE button will become available when all required steps are complete.
Understanding Step Types
-
- Date Steps
Tapping a date step will open the Date Picker. Once a date is selected, the Time Picker will open.

NOTE: It is not possible to remove the Time Picker. Date steps will always include both Date and Time.- Text Steps
Tapping a text step will open the text field and device keyboard
- Numeric Steps
Tapping a Numeric Step will open the numeric field and the device numeric keyboard.


NOTE: Some numeric steps include upper and/or lower limits. When no limits are being enforced (above left), only the required decimal precision will be displayed. When limits are being enforced (above left), the limits will be displayed below the required decimal precision and the step will remain red until a valid value is entered. The process cannot be completed until a valid value is entered. - Pass/Fail Steps
Tap PASS, FAIL or N/A (if applicable)
NOTE: Not all Pass/Fail steps will include a Not Applicable (N/A) option. In addition, some Pass/Fail steps will allow failures while others will not. See the Idencia Setup - Processes knowledge article for additional information about Pass/Fail step options. - Scan Tag Steps
When another RFID or Barcode/QR Code serial number needs to be scanned, tap the SCAN QR/BAR CODE button, or tap within the "Enter Value" field.
NOTE: If an external RFID or QR/Bar Code scanner is paired with the Idencia Mobile App, the app will assume the scanner will be used and the scan button description will be SCAN TAG. If no external scanner is paired, the app will assume the onboard camera will be used and the scan button description will be SCAN QR/BAR CODE.
Tapping the ENTER VALUE will open a text field where the serial number can be manually entered if it cannot be scanned. - Capture Signature Steps
Tapping the CAPTURE button will bring up the Signature screen. Use a stylus or finger to capture a signature or initials.

To recapture your signature, tap CLEAR. To accept the signature, tap CONFIRM. - GPS Steps
Tap LOCATE MY LOCATION to capture your current GPS location.
The GPS Coordinates will be displayed.
When tapping the GPS Location button for the first time, you may be asked to provide OnceSource with permission to access your device location.

- Take Picture Step
Tap CAMERA to open the device's camera app to take a photo. Tap GALLERY to upload a picture from the device's photo gallery.
When tapping the CAMERA button for the first time, you may be asked to provide OnceSource with permission to access your device camera.
When tapping the GALLERY button, the device photo gallery will open.
- Add to Job Step
Tapping ADD will open selection screens where the Job and Item Type to which the item should be added can be selected.
- Remove from Job Step
Tapping REMOVE will open a selection screen where a Generic Item Type (i.e., an Item Type that is not Job Specific) can be selected.
- Date Steps
Understanding Process Navigation - Buttons and Indicators
Cancelling a Process
To cancel a process:
- Tap the back button repeatedly until you've returned to the Home screen

Viewing Item Details
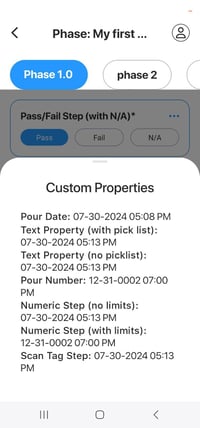
When working with an existing item, the item's current custom property values can be viewed by tapping the VIEW MORE link at the bottom of any process screen.
The custom properties list will pop up from the bottom of the screen.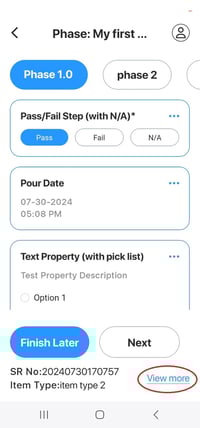
Process Execution Buttons

The Next button is used to complete the current phase in a multiphase process, and move from screen to screen. When in a process, tapping Next will complete the phase and move on to the next phase.

The Finish Later button is used to save your current progress and exit the process. Tapping Finish Later will leave the process incomplete so that information can be added and/or updated later.

The Done button is used to complete process. Once all required information has been entered across all phases of the process, the Done button will appear. In a multiphase process where the phases can be completed in any order, if the Done button does not appear at the bottom of the screen, one of the following two things must be true:
- There is at lease one required step that has not been completed. Look for steps that are highlighted in blue.
- There is a failed Pass/Fail step that must be set to Pass in order to complete the process. Look for failed steps and take the appropriate action fix the failure so that the step can be set to Pass
Process Completion Indicators
The Additional Processes screen will display a green checkmark next to each process that has been completed against an item at least once. Some processes may be completed against an item more than once. The indicator will appear next to each process that has been run against the item at least once.
In the example below, users can tell that the "Locate in Yard" process has been run against the selected item at least once. It may have been run multiple times, but the green checkmark indicates that the "Locate in Yard" process has been run at least once so far. The "Additional Test Process" has not been run against the selected item.
