![Idencia-Logos-White-2023.svg]](https://knowledge.idencia.com/hubfs/Idencia-Logos-White-2023.svg)
Applicable Subscription Levels:
QC MANAGER | STARTER | PRO | PRO+ | ENTERPRISE
Overview
The heart of the Idencia system is the Process. The Process is a series of Steps used to collect information about an item. These steps are grouped into one or more Phases.
This article includes the following topics:
Set Text Custom Property Value Step
Set Numeric Custom Property Value Step
Set a formula for Upper and Lower Limits
Set Date Custom Property Value Step
Creating Processes
There are 3 steps in creating Processes. These are:
- Defining the Process
- Creating Steps
- Creating Phases
Defining the Process
To define the Process, follow the steps below:
- From the left-hand navigation menu, select Setup->Processes. This will display the Processes page. All existing Processes that you have created will be displayed.
- Click New Process. The Create New Process screen will be displayed.
- Name: Enter the name of the new Process.
- Make this process available to existing Items and Item Groups: If you want this Process to be available to items that already exist in your Idencia database, check this box. For example, a shipping process will be run against existing items (you wouldn't ship items that don't exist). If this box is left unchecked, the process can only be used as a default process.
- Show this process based on Custom Property value: This option is only available when the Make this process available to existing Items and Item Groups option is Active. This option is particularly useful when creating processes that should only be run when an item is in a certain status. A shipping processes, for example, could be configured so that it is only available when the 'Product Status' field says "Finished Goods". The process would not be available when an Item of any other status is scanned. Any Item Custom Property can be used to trigger the availability of a process. Currently, Item Type and project Custom Properties are not available here.
- Show all steps of Phase on one screen: <This checkbox is now permanently active> This option is exactly what it sounds like. If the box is checked, all steps of a phase are shown on one screen in the mobile application. If this box is not checked, steps are displayed one at a time. The user will be required to click 'Next' after completing each step.
- Complete Phases in any order: This option is also exactly what it sounds like. If the box is checked, the user will have the ability to complete the process phases in any order. This option is only available when the Show all steps of Phase on one screen option is Active.
- Managed by Exception: This option is only available when Complete Phases in any order" option is Inactive. If this box is checked, you will be presented with the opportunity to configure time frames within which each phase of the process must be complete. Phases not complete within the given time frame will result in email notification to the specified users. See the What is Management by Exception? knowledge article for more information about this option.
- Click Save to proceed to creating Phases and Steps.
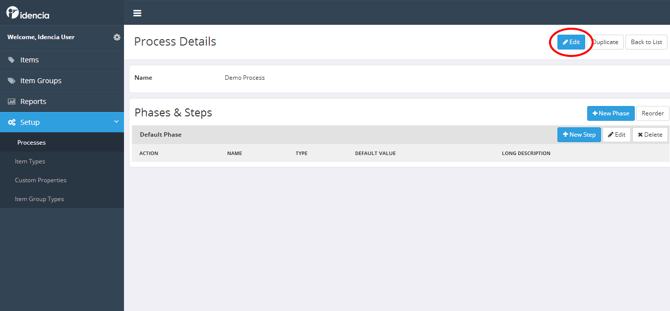
After the Process is named, the Process Details page is displayed.

Here you can define the Phases and Steps of the process. Every Process must have at least one Phase. A Phase called 'Default Phase' is automatically created for you. You can use this Phase as is, or change it's name. See the Editing Phases section below for more information.
Creating Steps
You can now create the Steps that will be grouped in a Phase.
- To do this, select the New Step button that is in the Phase label. The Create New Step page will display.
- Select the type of step and then select the Next button. See the Step Types section below for a detailed description of each Step type.
- Enter the Name of the Step and an optional Long Description. Some Step types will require you to enter or select additional information.
- Select the Save button to create the Step. The Process Details page will display and you will now see your newly created Step.
- Repeat this process for each Step you would like in the Phase.
Step Types
There are different types of Steps to record different data.
Pass/Fail Step
A Pass/Fail Step is used to record a simple Pass or Fail entry. This is the most commonly used Step type. Some examples where it can be used are as part of a check list for production, or as an inspection after production.
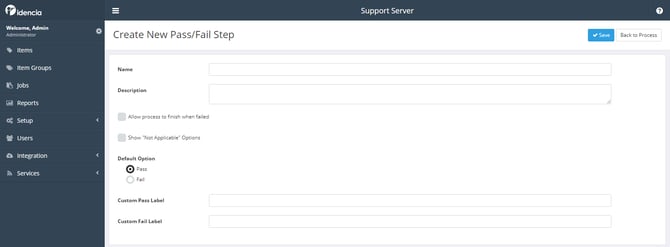
The following values are used to define a Pass/Fail Step:
- Name - a short unique name for the step.
- Description (optional) - an optional description used to give your production workers more information about what to check in this step.
The Pass/Fail Step has the following behavior:
- The a Step is marked as Failed, the Item will be shown with a red exclamation point "!" in the View Items list on the Idencia mobile app.
- The current Process will not be completed until all Pass/Fail Steps are marked as Passed.
- If you select an Item that has Failed steps, those Steps will be displayed again to allow you to mark them as Passed. Once all Failed Steps are marked as Passed, you will be able to complete the Process.
Additional Pass/Fail Step Options
There are several Pass/Fail Step configuration options available.
- Allow process to finish when failed - When this option is checked, the process will be marked 'Complete' once all of the required steps have been completed. If this option is left unchecked, the process will remain 'Incomplete' until all required steps have been completed AND this step is marked 'PASS'. See the Making Steps Required or Must Pass article for additional information about this setting.
- Show "Not Applicable" Options - When this option is checked, the user will be presented with a 'Not Applicable' option when completing the Step in the Mobile Application.
- Default Option - The default value that will be used for the step in the Mobile Application
- Custom Pass, Fail, and N/A Labels - Some Pass/Fail steps may be more suited to labels like 'Yes' and 'No' or 'Good' and 'Bad' instead of 'Pass' and 'Fail'. Set custom labels for the Pass/Fail and N/A options here.
Set Text Custom Property Value Step
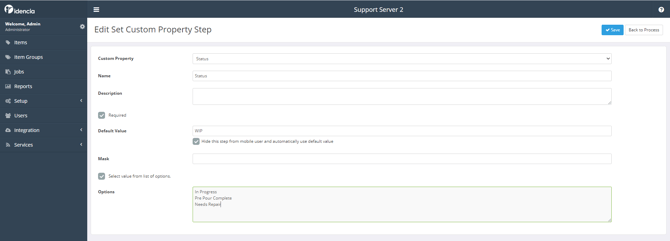
A Set Text Custom Property Value Step is used to collect all textual information. Examples of Text Custom Property Steps are entering a Form ID, or concrete batch number.
The following values are used to define a Set Text Custom Property Value Step:
- Custom Property - select the Text Custom Property to use (see the What are custom properties? knowledge article for more information).
- If the desired custom property does not exist, select Create New Custom Property
The Create New Custom Property screen will be displayed
- Name - Enter a name for the new custom property
- Show in Mobile App - Check this box if the custom property should appear in the mobile application (see the What are custom properties? knowledge article for more information)
- Click Save
You will be returned to the Set Custom Property Step screen
- If the desired custom property does not exist, select Create New Custom Property
-
- Select the newly created custom property from the Custom Property drop-down list
- Name - a short unique name for the step.
- Description (optional) - an optional description used to give your production workers more information about what text to enter in this step.
- Required (optional) - if the step should be required (cannot be left blank in the mobile application), check this box
- Default Value (optional) - an optional default value for this Step. If you enter a value here, when the Step is displayed on the Mobile App, this value will be set automatically. If you choose to set a default value, an additional checkbox will display to allow you to hide this step from the mobile user. If you select the checkbox, the production worker will not see this step on the Mobile App and the default value will automatically be used. This is a great way to set a Status for a product during the different phases of production and inventory.
- Mask (optional) - an optional input mask to specify the format of the text to be entered. Using an input mask will force the production worker to enter the text in the specified format before he will be allowed to proceed to the next step. If a format mask is used with a default value, the default will be verified that it follows the format mask.
The format mask has the following characters:- 0 - Used to specify a required number.
- L - Used to specify a required letter.
- ? - Used to specify an optional letter. Can only be used at the end of a mask.
- > - All letters following this character will be forced to uppercase.
- Select value from list of options (optional) - If the end user should be presented with a drop down list of choices for this field, check this box. A new box will appear where the list of values should be entered, each value on a separate line.
Set Numeric Custom Property Value Step
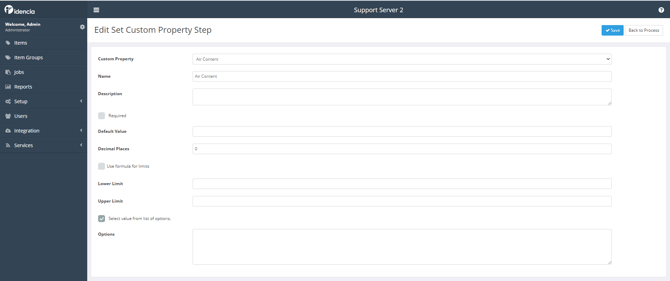
A Set Numeric Custom Property Value Step is used to collect all numeric information. Examples of Numeric Custom Property Steps are entering a Slump value, or a measured length.
The following values are used to define a Set Numeric Custom Property Value Step:
- Custom Property - select the Numeric Custom Property to use (see the What are custom properties? knowledge article for more information)
- If the desired custom property does not exist, select Create New Custom Property
The Create New Custom Property screen will be displayed - Name - Enter a name for the new custom property
- Show in Mobile App - Check this box if the custom property should appear in the mobile application (see the What are custom properties? knowledge article for more information)
- Click Save
You will be returned to the Set Custom Property Step screen - Select the newly created custom property from the Custom Property drop-down list
- If the desired custom property does not exist, select Create New Custom Property
- Name - a short unique name for the step.
- Description (optional) - an optional description used to give your production workers more information about what values to enter in this step.
- Required (optional) - if the step should be required (cannot be left blank in the mobile application), check this box
- Default Value (optional) - an optional default value for this Step. If you enter a value here, when the Step is displayed on the Mobile App, this value will be shown automatically. If you set a default value, a checkbox will display to allow you to hide this Set Custom Property Step. If you select the checkbox, the production worker will not see this step on the Mobile App and the default value will automatically be used.
- Decimal Places - the minimum number of decimal places that must be entered for this Step in the mobile application.
- Use Formula for Limits (optional) - an optional setting allowing you to enter a formula that will be used to calculate the Upper & Lower limits (below). Formulas can include Item Type Custom Properties using curly brackets.
-
- If this checkbox is checked, the Default Value field becomes unavailable.
- Curly brackets can be used to access Item Type Custom properties that can be included in the formula.
Example:
You have an Item Type that includes a custom property for Design Height.
Your post pour process includes a step to enter the actual Height of the finished product.
Design specs dictate that the actual height must be within +/- 0.15" of the Design Height.
In this scenario, you might want your Upper and Lower Limits set as in the example below:
To configure an Upper or Lower Limit to use a formula:
1. Check the Use Formula for Limits checkbox
2. Enter a valid formula in one or more of the Upper or Lower Limit fields
3. To include an Item Type Custom Property in your formula, enter an open curly bracket ( { )
A popup list of Numeric Item Type Custom Properties will appear (similar to below)

3. Select the appropriate property from the list and continue entering your formula.
-
- Upper Limit (optional) - the upper limit of a range within which the entered value must reside. By default, only numbers lower than or equal to this limit will be allowed. If an upper limit is set, the default value entered must meet this requirement.
- Lower Limit (optional) - the lower limit of an optional range within which the entered value must reside. By default, only numbers higher than or equal to this limit will be allowed. If a lower limit is set, the default value must meet this requirement.
- If an upper and/or lower limit is set, a new checkbox will display to allow entering of values outside the range. If this checkbox is turned on, the user will be able to enter values outside of the range. Values outside of the range will trigger the step as a Failed step. See the Pass/Fail step section for the behavior of a Failed step.
Set Date Custom Property Value Step

A Set Date Custom Property Value Step is used to collect a date. Examples of Date Custom Property Steps are entering a date of delivery, or design date.
The following values are used to define a Set Date Custom Property Value Step:
- Custom Property - select the Date Custom Property to use (see the What are custom properties? knowledge article for more information).
- If the desired custom property does not exist, select Create New Custom Property
The Create New Custom Property screen will be displayed - Name - Enter a name for the new custom property
- Show in Mobile App - Check this box if the custom property should appear in the mobile application (see the What are custom properties? knowledge article for more information)
- Click Save
You will be returned to the Set Custom Property Step screen - Select the newly created custom property from the Custom Property drop-down list
- If the desired custom property does not exist, select Create New Custom Property
- Name - a short unique name for the step.
- Description (optional) - an optional description used to give your production workers more information about what date to enter in this step.
- Required (optional) - if the step should be required (cannot be left blank in the mobile application), check this box
- Default to Current Date (optional) - if the step should default to the current date, check this box
Set GPS Location Step
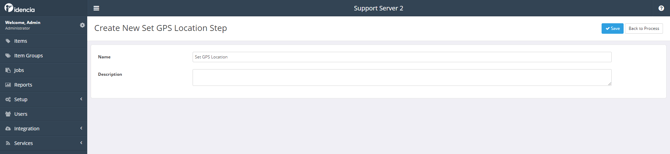
A Set GPS Location Step is used when you want to record your GPS Location when you scan a tag. If a GPS Location is set, a map showing that location will be displayed when you view that Item in the Management Portal.
The following values are used to define a Set TGPS Location Step:
- Name - a short unique name for the step.
- Description (optional) - an optional description used to give your production workers more information about what text to do for this step.
Take Picture Step
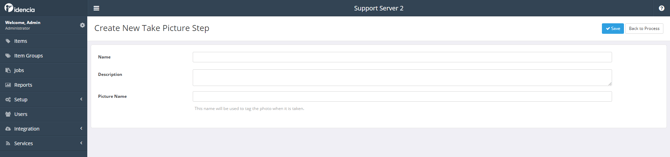
Using a Take Picture Step, you can take or upload a picture during a Process to record a visual image that is stored with the item. Users will be given the option to take a photo using their mobile device, upload a photo from the gallery, or tap the N/A button. If a picture is taken or uploaded, the picture will be displayed when you view that Item in the Management Portal.
The following values are used to define a Take Picture Step:
- Name - a short unique name for the step.
- Description (optional) - an optional description used to give your production workers more information about what text to do for this step.
Add Item to Project Step
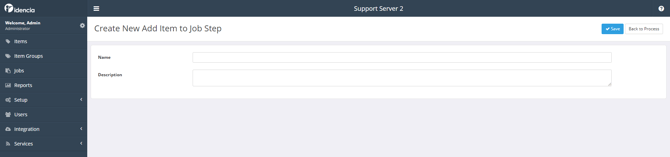
Using the Add Item to project step, you can provide mobile application users with the ability to Add a stock item to a project or move an item from one project to another.
The following values are used to define an Add Item to project Step:
- Name - a short unique name for the step.
- Description (optional) - an optional description used to give your production workers more information about what to do for this step.
Remove Item from Project Step
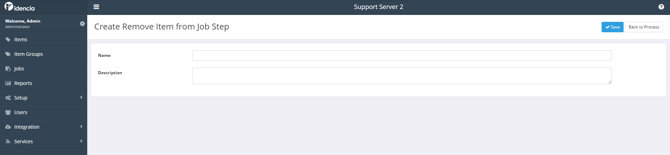
Using the Remove Item from project step, you can provide mobile application users with the ability to Remove an item from a project. This step results in the item not being a member of any project. If this step is run against an item that is already not part of a project, the mobile application user will be given the opportunity to change the stock item's Item Type.
The following values are used to define a Remove Item from project Step:
- Name - a short unique name for the step.
- Description (optional) - an optional description used to give your production workers more information about what to do for this step.
Scan Tag Step

Using the Scan Tag step, you can provide mobile application users with the ability to scan another RFID tag or Barcode (or manually enter a serial number) in order to create an association between two items. For example, you might want to affix RFID tags or Barcode labels to the outside of each of your molds and forms. Your Pre-pour process could then be updated to include a "Scan Tag" step where the user scans the barcode of the form, creating an association between the serial number of the product being produced and the form or mold in which it was poured.
The following values are used to define a Scan Tag Step:
- Custom Property - select the Text Custom Property that will be populated with the scanned serial number.
- Name - a short unique name for the step.
- Description (optional) - an optional description used to give your production workers more information about what to do for this step.
- Required (optional) - if the step should be required (cannot be left blank in the mobile application), check this box.
Creating Phases
To create additional Phases, select the New Phase button on the Process Details page. Give the new Phase a Name and select the Save button. The new Phase will be displayed on the Process Details page. You can now add Steps to this Phase by following the steps above.
If your process is Managed by Exception, a Completion Time Limit, days field will be available. See the What is Management by Exception? knowledge article for a detailed explanation of this option.
Editing Processes
You can edit a Process, including making changes to Phases and Steps, at any time. To edit a Process, simply select the Process name from the Processes page. When an Item is created using a Process, a snapshot of that Process is taken and associated with that Item. Because of this, the Process can be changed without affecting Items that have already been created. If a Process is edited, a new snapshot will be taken of that Process and associated to Items created using the new version of the Process.
Changing a Process Name
To change the name of a Process, simply select the Edit button at the top of the Process Details screen. The Edit Process screen will display. Here you can enter the new name of the Process. Select the Save button and the new Process name is saved and the Process Details screen is displayed again.
Editing Phases

To change the name of a Phase or it's completion time limit, select the Edit button in the Phase label. Enter the new name of the Phase and select the Save button and the new Phase name is saved and the Process Details screen is displayed again.
Deleting Phases

To delete a Phase, select the Delete button in the Phase label. A confirmation screen will be displayed. Selecting the Delete button will remove the Phase and any Steps in that Phase from the Process.
NOTE: See the article What are Process Phases? for more information on process phase options and their affect on the mobile application user experience.
Adding Steps

To add a Step, click the "New Step" button. The Create New Step screen will appear. Follow the instructions in the Creating Steps section above to add a new step to the process. Once added, you can reorder the steps as well.
Editing Steps

To edit a Step, select the Edit icon in the Step. The Edit Step screen will be displayed for the type of Step you selected. Here you can change the Name and Long Description of the Step. You can also change additional information based on the type of Step you are editing.
Deleting Steps

To delete a Step, select the Delete icon in the Step. A confirmation screen will be displayed. Selecting the Delete button will remove the Step from the Process.
Reordering Steps and Phases
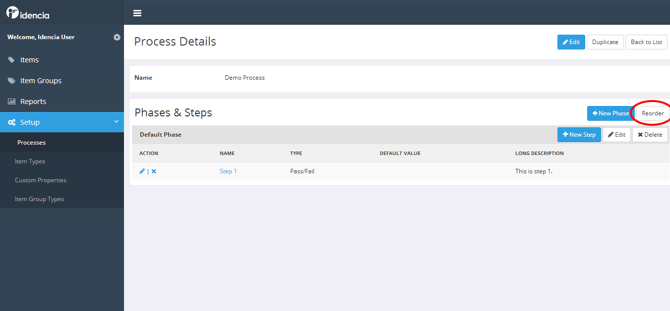
The Steps and Phases within a Process can be moved earlier or later in the Process. Steps can also be moved from one Phase to another. To reorder the Steps or Phases within a Process select the Reorder button on the Process Details screen. The Reorder screen will display.
- To reorder a Step, simply select the Step you wish to move, then press the up or down arrows. You will see the Step move in the direction you indicated. Continuing to move the step past the start or end of the current Phase will move the step to the earlier or later Phase in the Process.
- To reorder a Phase, select the Phase name. All of the Steps within that Phase will be highlighted. Now press the up or down arrow to move the Phase before or behind other Phases.
Duplicating Processes
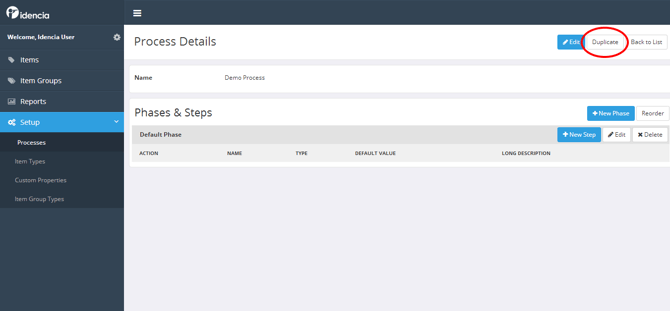
If you need to make a Process that is similar to an existing Process, you can duplicate the existing Process instead of creating a new Process from scratch. To make a duplication of an existing Process, follow the steps below:
- Select Setup->Processes from the Main Menu.
- Select the name of the Process you wish to duplicate from the Processes screen. This will display the Process Details screen.
- Select the Duplicate button at the top of the Process Details screen. The Process is copied, and the Process Details screen is displayed showing the duplicated Process. The name of the new Process is automatically set to "Copy of" the name of the process you duplicated.
- You can now change the name of the duplicated Process, and make any changes necessary. For more information about editing Processes, see the Editing Processes section above.