![Idencia-Logos-White-2023.svg]](https://knowledge.idencia.com/hubfs/Idencia-Logos-White-2023.svg)
NOTE: This lesson plan is designed for use in our Tutorial system where hands-on exercises and datasets can be created without affecting your Production Idencia system. If you viewing this lesson plan from within your production Idencia site, please contact your customer liaison for access to our Tutorial site for hands-on learning.
Before we move on to building shipping and other more complex processes, let's circle back to some of the options we skipped over in previous lessons.
In this lesson, we'll cover:
Additional Process Options
Make this process available to existing Items and Item Groups
Show this process based on Custom Property value
Show all steps of Phase on one screen
Complete Phases in any order
Managed by Exception
Additional Numeric Step Options
Use Formula for Limits
Additional Pass/Fail Step Options
Allow process to finish when failed
Show "Not Applicable" Options
Default Option
Custom Pass, Fail, and N/A Labels
Additional Process Options
There are five configuration options available when creating a new process.

Make this process available to existing Items and Item Groups
This options determines whether or not the process is available to Items (serial numbers) and Item Groups (groups of serial numbers) that already exist in the Idencia Database. Depending on your business practices, some processes are only valid for new items.
Show this process based on Custom Property value
This option is particularly useful when creating processes that should only be run when an item is in a certain status. Shipping processes, like the one pictured above, would only be available when the 'Product Status' field says "Finished Goods". This process would not be available when an Item of any other status is scanned. Any Item Custom Property can be used to trigger the availability of a process. Currently, Item Type and Job Custom Properties are not available here.
Show all steps of Phase on one screen
<This checkbox is now permanently active> This option is exactly what it sounds like. If the box is checked, all steps of a phase are shown on one screen in the mobile application. If this box is not checked, steps are displayed one at a time. The user will be required to click 'Next' after completing each step. See the example screen shots below.
Complete Phases in any order
This option is also exactly what it sounds like. If the box is checked, the user will have the ability to complete the process phases in any order. This option is only available when the 'Show all steps of Phase on one screen' option is checked. See the example screen shots below.
Managed by Exception
This option is only available when "Complete Phases in any order" is UN-checked. If this box is checked, you will be presented with the opportunity to configure time frames within which each phase of the process must be complete. Phases not complete within the given time frame will result in email notification to the specified users. See the Management by Exception knowledge article for more information about this option.
Example Screen Shots:
.png?width=345&name=mceclip0%20(1).png)
- Show all steps of Phase on one screen = NO
- Complete Phases in any order = N/A
By leaving the Show all steps of Phase on one screen option un-checked you can force the user to complete all steps and phases in order. When this option is un-checked, the Complete Phases in any order option is hidden. Both the Phases, and the steps within each Phase must be completed in order.

As you can see from the example above, only one step can be seen at a time. The user will need to click 'Next' to get to the next step in the current phase. In this example, the first step (Shipping Date) in the first phase (Load Shipment) are displayed.

- Show all steps of Phase on one screen = YES
- Complete Phases in any order = NO

In this example, both steps in the first phase, Load Shipment, are displayed in the same screen. Because the Complete Phases in any order option is set to NO, subsequent phases are not available an cannot be seen. The user must complete the steps in the first phase and click 'Next' in order to get to the next phase.
When the user clicks 'Next,' the current phase is marked complete and the user is given the option to exit the process or continue to the next phase.

If the user chooses to Exit the process, the next time the tag is scanned the user will automatically be taken to the next phase of the process where they left off. No new processes cannot be started against this item until all phases of the current process are complete.
This configuration makes sense for this shipping process. The remaining phases of this process (Validate & Approve Shipment, and Ship) should not be completed before the Load Shipment phase is complete.
There are some drawbacks to this configuration, however. Setting the configuration options so that the user is forced to complete the phases in the appropriate order also prevents the user from returning to a previous phases. Once a phase is complete, you cannot go back, even to correct a mistake.

- Show all steps of Phase on one screen = YES
- Complete Phases in any order = YES

In this example, notice that the process phases are now displayed as tabs along the top of the screen. The first phase, Load Shipment, is displayed first; however, the user has the ability to tap on any other phase and complete the phases in any order. Again, both steps in the Load Shipment phase are displayed in the same screen.
Because of the nature of this shipping process, configuring the process to allow phases to be completed in any order is probably not the best choice. You don't want the Ship phase to be completed before the Load Shipment phase.
Additional Numeric Step Options

Use Formula for Limits
- Use Formula for Limits (optional) - an optional setting allowing you to enter a formula that will be used to calculate the Upper & Lower limits (below). Formulas can include Item Type Custom Properties using curly brackets.
-
- If this checkbox is checked, the Default Value field becomes unavailable.
- Curly brackets ( {} ) can be used to include Item Type Custom properties in the formula.
Example:
- You have an Item Type that includes a custom property for Design Height.
- Your post pour process includes a step to enter the actual Height of the finished product.
- Design specs dictate that the actual height must be within +/- 0.15" of the Design Height.
In this scenario, you might want your Upper and Lower Limits set as in the example below:
To configure a formula in the Upper or Lower Limit fields:
1. Check the Use Formula for Limits checkbox
2. Enter a valid formula in one or more of the Upper or Lower Limit fields
- To include an Item Type Custom Property in the formula, enter an open curly bracket ( { )
- A popup list of Numeric Item Type Custom Properties will appear (see below)
- Select the appropriate property from the list and continue entering your formula.

-
Additional Pass/Fail Step Options
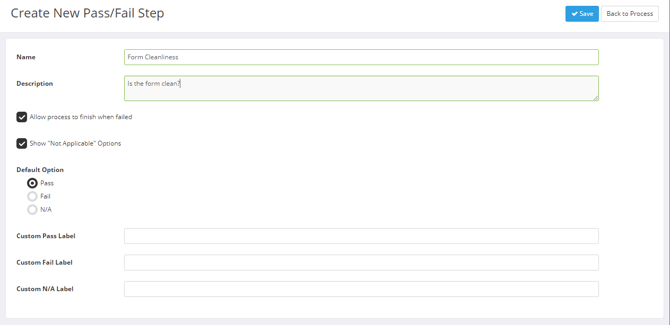
Allow process to finish when failed
When this option is checked, the process will be marked 'Complete' once all of the required steps have been completed. If this option is left unchecked, the process will remain 'Incomplete' until all required steps have been completed AND this step is marked 'PASS'. See the Make a Process Step Required or Must Pass article for additional information about this setting.
Show "Not Applicable" Options
When this option is checked, the user will be presented with a 'Not Applicable' option when completing the Step in the Mobile Application.
Default Option
The default value that will be used for the step in the Mobile Application
Custom Pass, Fail, and N/A Labels
Some Pass/Fail steps may be more suited to labels like 'Yes' and 'No' or 'Good' and 'Bad' instead of 'Pass' and 'Fail'. Set custom labels for the Pass/Fail and N/A options here.
++ Close this window now to return to the Tutorial website and start the next task in the Task List.++
++ You may continue to the next task using the link below; however, using the link below will not ++
++ mark the tasks as complete in the Task List. ++
<< Previous: Idencia 101-20: Importing Item Types
>> Next: Idencia 101-22: Shipping