![Idencia-Logos-White-2023.svg]](https://knowledge.idencia.com/hubfs/Idencia-Logos-White-2023.svg)
Applicable Subscription Levels:
QMS | PRO+ | ENTERPRISE | Inventory Cycle Counts
Overview
ForneyVault is a cloud-based materials testing platform linked to your FORNEY* compression testing equipment. Idencia subscribers who also subscribe to ForneyVault can integrate these systems and achieve a seamless transfer of sample and specimen information from Idencia to ForenyVault, and compression test results from ForneyVault back to Idencia. This integration eliminates human error and increases the accuracy and timeliness of the data in your Idencia database.
This article will cover the following topics:
How it Works
An Item Type or Custom Item Type is created in the Idencia system for each combination of cylinder counts and break days you typically use when performing compressive strength tests.
When an Item is created using any of the Item Types or Custom Item Types defined for compressive testing, the Idencia application will create the appropriate sample and specimen information in ForneyVault.
On the appropriate days, each cylinder in the set is tested using the Forney equipment.
Idencia polls the ForneyVault database for test results every hour on the half hour. When results are found, Idencia will display the test results in the Item Details screen.
Integration
Prerequisites
- You must have Admin permission in the Idencia Management Portal to complete the steps below.
- Contact your Forney representative to obtain the integration credentials required to complete the steps below.
STEP 1 - Enter ForneyVault Credentials
- In the left-hand navigation menu, select Integration --> ForneyVault
The configuration screen will appear.
- Enter the URL of your ForneyVault instance
- Enter the Login ID that Idencia should be used to access your ForneyVault instance
- Enter the Password that Idencia should use to access your ForneyVault instance
- Click Save
Configuration
Prerequisites
- You must have Limited Editing permission in the Idencia Management Portal to complete the steps below.
STEP 1 - Create Required Item Custom Properties
Create Item Custom Properties for each of the data points that will be required by the Forney equipment.
- Create an Item Custom Property for the ForneyVault Lab Name of the cylinders.
- Create an Item Custom Property for the Pour Date of the cylinders.
- Create an Item Custom Property for the Diameter of the cylinders.
- Create an Item Custom Property for the Length of the cylinders.
- Create an Item Custom Property for the targeted Design Strength of the cylinders.
- Create an Item Custom Property for the targeted Stripping Strength of the cylinders
This information will be captured each time a new set of cylinders is created.
STEP 2 - Define the Default Process
- Create or edit a Process to capture the Lab Name, Pour Date, Diameter, Length, Stripping Strength and Expected Ultimate Strength (Design Strength) of each cylinder set using the Custom Properties created in STEP 1 above.
Typically, steps to capture this information are included in the same process where concrete wet test information is captured (i.e., air, slump, temperature, etc.). Below is an example process.
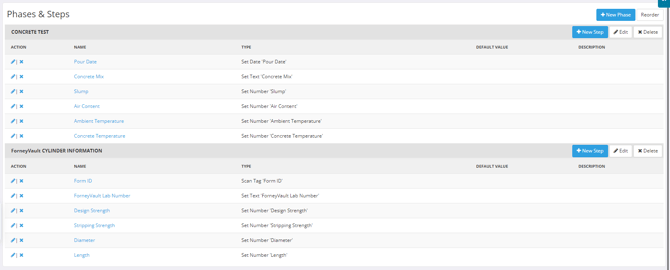
STEP 3 - Define Item Types & Custom Item Types
An Item Type or Custom Item Type must be created for each unique combination of cylinder counts and break days you use for compressive testing. Each combination must be represented by it's own Item Type or Custom Item Type. For example, you may have requirements similar to the chart below. In this example, an Item Type or Custom Item Type will need to be created for each Test Category listed.
Example Test Category Chart
| Test Category # | Mix Type | Used For | Total Cylinders Poured | Break Day | Number Cylinders Broken |
| 1 | Mix 1 | Testing Stock Product | 6 |
0 (Stripping Break) |
2 |
| 1 | 2 | ||||
| 7 | 2 | ||||
| 2 | Mix 1 | Testing customer-specific specs for Job #10818.5 | 7 |
0 (Stripping Break) |
1 |
| 3 | 2 | ||||
| 7 | 2 | ||||
| 14 | 2 | ||||
| 3 | Mix 2 | Testing Stock Product | 8 | 1 | 2 |
| 7 | 2 | ||||
| 14 | 2 | ||||
| 27 | 2 | ||||
| 4 | Mix 3 | Testing Stock Product | 4 | 3 | 2 |
| 7 | 2 | ||||
| 5 | Mix 3 | Testing customer-specific specs for Job #3569B | 5 |
0 (Stripping Break) |
1 |
|
3 |
2 | ||||
|
7 |
2 |
Whether you create Item Types, Custom Item Types, or a combination of both will depend on whether you use the Idencia Jobs feature.
Test categories that are not Job specific:
- Follow the instructions in the Idencia Setup - Item Types knowledge article to create an Item Type for each test category that is not Job specific.
Below is an example of three Item Types created for the stock Test Categories in the Example Test Category Chart above (Test Categories 1, 3 & 4)
NOTE: The process defined in STEP 2 above must be used as the Default Process for these Item Types.
Test categories that only apply to specific Jobs:
- Follow the instructions in the Working With Jobs in the Management Portal knowledge article to create a Custom Item Type within each Job where custom test categories will be used.
Below is an example Custom Item Type created for the customer specific requirements in Test Category #2 in the Example Test Category Chart above.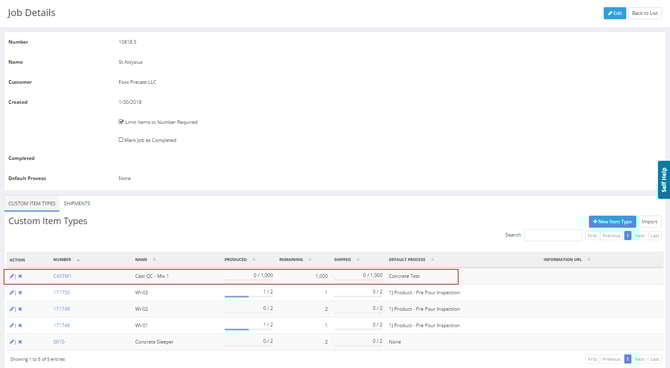
NOTE: The process defined in STEP 2 above must be used as the Default Process for these Custom Item Types. When creating Custom Item Types, a quantity will be required. Enter the estimated number of cylinder sets you will be pouring to complete the given Job. This quantity can be adjusted later, if needed.
STEP 4 - Define Testing Requirements
As you did with Item Types and Custom Item Types, you'll need to configure testing requirements for each of your test categories based on whether they are Job specific. The examples below will be based on the test categories in the Example Test Category Chart above (Test Categories 1, 3 & 4)
Test categories that are not Job specific:
- In the left-hand navigation menu, select Services --> ForneyVault
- Click the Strength Tests tab
The Strength Tests tab will appear:
- Click New Strength Test
The Create New Settings screen will appear:
- By default, the Enable check box will be checked. Uncheck this box to disable to Strength Test category.
- Check the Use Metric Units if your organization will enter cylinder Diameter and Length in Centimeters rather than Inches.
NOTE: All measurements (Length, Diameter, Expected Strength, etc.) are sent to ForneyVault in Imperial Units (English Inches or PSI). Checking this box will allow you to enter cylinder Diameter and Length in Centimeters rather than Inches and Strength values in MPa rather than PSI. Idencia will convert the Metric units to Imperial units when sending data to ForneyVault. If your ForneyVault instance is configured for Metric units DO NOT CHECK THIS BOX. This box only needs to be checked when Idencia needs to perform a conversion from Metric to English prior to sending data to Forney. - DO NOT Enter a Project Number for the cylinder set
- Project Numbers** currently restrict data from seamlessly connecting between Idencia and ForneyVault. We will be doing more investigation once migration to Idencia's Aiden is complete for all customers.
- Select an Item Type representing your first test category that is not Job specific
- Enter a Title for the test category
- Select the Lab Name Custom Property
- Select the Diameter Custom Property
- Select the Length Custom Property
- Select the Design Strength Custom Property
- Select the Stripping Strength Custom Property
NOTE: The Stripping Strength value captured when creating your cylinders will be sent to ForneyVault for all cylinders where the break date is less than or equal to (<=) 1. - Under Age to Break, in the Day column, enter the age in days when the first cylinder in the set will be broken. If the first break day is the same as the Pour Date (e.g., Stripping Break), enter 0 here. Max Age to Break = 180 days.
- Under Age to Break, in the Count column, enter the number of cylinders that will be broken on this day.
- Click the Plus (+) symbol. A new row will appear.
- In the Day column of the new row, enter the age in days when the next cylinder(s) in the set will be broken. Max Age to Break = 180 days.
- In the Count column of the new row, enter the number of cylinders that will be broken on this day.
- Repeat steps 12 - 14 until all break days and counts have been entered for the test category.
- Click Save
Below is an overview of Test Category #1 in the Example Test Category Chart, and how that test category would be configured.
Test Category # Mix Type Used For Total Cylinders Poured Break Day Number Cylinders Broken 1 Mix 1 Testing Stock Product 6 0
(Stripping Break)
2 1 2 7 2
Configuration:
- Repeat these steps for each test category in your list that is not Job specific.
Test categories that only apply to specific Jobs:
- In the left-hand navigation menu, select Jobs
- Select a Job with custom strength test requirements
- Click the Strength Tests tab
The Strength Tests tab will appear:.jpg?width=670&name=ForneyCustomStrengthTests%20(1).jpg)
- Click New Strength Test
The Create New Settings screen will appear: - By default, the Enable check box will be checked. Uncheck this box to disable to Strength Test category.
- Check the Use Metric Units if your organization will enter cylinder Diameter and Length in Centimeters rather than Inches.
NOTE: All units in ForneyVault are in Imperial Units (English Inches). Checking this box will allow you to enter cylinder Diameter and Length in Centimeters rather than Inches. Idencia will convert the Metric units to Imperial units when sending data to ForneyVault. - Select a Custom Item Type representing a test category specific to the Job
- If the Job testing requirements are the same as an existing stock testing requirement, select the stock testing requirement from the ForneyVault Setting drop down list and jump to Step 18 below. If not, skip this step.
- Enter a Title for the test category
- Select the Lab Name Custom Property
- Select the Diameter Custom Property
- Select the Length Custom Property
- Select the Design Strength Custom Property
- Select the Stripping Strength Custom Property
NOTE: The Stripping Strength value captured when creating your cylinders will be sent to ForneyVault for all cylinders where the break date is less than or equal to (<=) 1. - Under Age to Break, in the Day column, enter the age in days when the first cylinder in the set will be broken. If the first break day is the same as the Pour Date (e.g., Stripping Break), enter 0 here.
- Under Age to Break, in the Count column, enter the number of cylinders that will be broken on this day.
- Click the Plus (+) symbol. A new row will appear.
- In the Day column of the new row, enter the age in days when the next cylinder(s) in the set will be broken.
- In the Count column of the new row, enter the number of cylinders that will be broken on this day.
- Repeat steps 12 - 14 until all break days and counts have been entered for the test category.
- Click Save
Below is an overview of Test Category #2 in the Example Test Category Chart, and how that test category would be configured.
Test Category # Mix Type Used For Total Cylinders Poured Break Day Number Cylinders Broken 2 Mix 1 Testing customer-specific specs for Job #10818.5 7 0
(Stripping Break)
1 3 2 7 2 14 2
Configuration: - Repeat these steps for each Job specific test category.
Test Your Integration
Now that you have configured the Idencia - ForneyVault integration, let's test to be sure things are working as expected.
- Create a new Item in your Idencia system to represent a set of test cylinders. Be sure to use one of the Item Types created in the configuration process above.
The new item can be created manually in the management portal, you can create the item in the mobile application and sync it to the management portal, or you can import the item from a .csv file.
Regardless of the method you use to create the Item, be sure to include values for Lab Name, Diameter, Length, Design Strength and Stripping Strength. - Check your ForneyVault instance and verify that a new sample with the appropriate specimens has been created.
- Using the Forney equipment, enter test results for the first cylinder in the set.
- In Idencia, open the Item Details screen for the item created in Step 1 above.
A new section will appear in the Item Details screen where ForneyVault data will be displayed. The size of this new section will depend on your specific Forney configuration, the number of break days and the count of cylinders that will be broken on each break day.
In the example below, the configuration was set up for 3 break days.
- 1 day break consisting of 3 cylinders
- 7 day break consisting of 6 cylinders
- 28 day break consisting of 6 cylinders
Test results were captured in ForneyVault for all three of the 1 day break cylinders, and one of the 7 day break cylinders. The averages of each break day are displayed once data is available.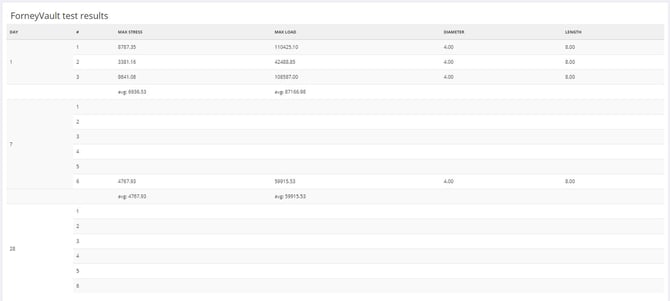
- Verify that the test results have been retrieved and are displayed in the appropriate row and column on the item.
If the test results do not appear, you may need to wait until the next retrieval time. Idencia will check the ForneyVault instance for test results every hour on the half hour (i.e., 8:30, 9:30, 10:30...). If the test results do not appear after the next retrieval time, contact Idencia Support using the Help button in your Management Portal.
* For more information about FORNEY equipment or the ForneyVault® platform, see https://forneyvault.com
** Project Numbers group cylinders together into "folders" in ForneyVault. Ask your Forney representative for more information about how to create and find Project Numbers in ForneyVault.