![Idencia-Logos-White-2023.svg]](https://knowledge.idencia.com/hubfs/Idencia-Logos-White-2023.svg)
Applicable Subscription Levels:
QC MANAGER | STARTER | PRO | PRO+ | ENTERPRISE
Overview
Items are the things being created and tracked in the Idencia system. Items usually represent individual products that are tracked through the manufacturing process, but they can also represent pieces of equipment that are tracked through maintenance and inspection cycles, they can represent tools that are tracked through employee check-out and check-in cycles, just about anything you can serialize, you can track in the Idencia system. Using the Idencia Management Portal, it is very simple to view and manage the Items you create.
Topics in this article include:
Viewing All Items
Viewing Item Details
Creating Items
Editing Items
Deleting Items
Viewing All Items
By selecting Items from the Main menu, you are able to see a list of all the Items created using the system. You can change the sorting of the Items list by selecting the sort icon next to each Item list header. You can also filter the Item list by entering a value in the Search box.
Viewing Item Details
Selecting an Item's serial number from this list will display a detailed view of the Item, including the GPS location (if captured), any images and file attachments associated with the item, and the current value of all it's Custom Properties, and the Process history for that Item.
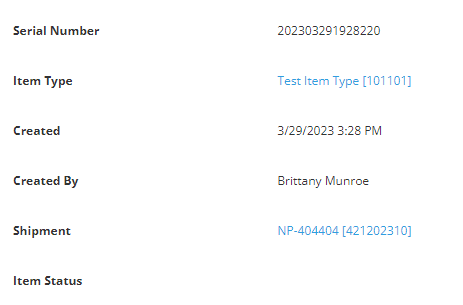
Standard Properties
Standard properties appear on every Item.
- Serial Number
- Item Type
- Created (the Date the item was created in the database)
- Created By (the user who created the item in the database)
- Item Status
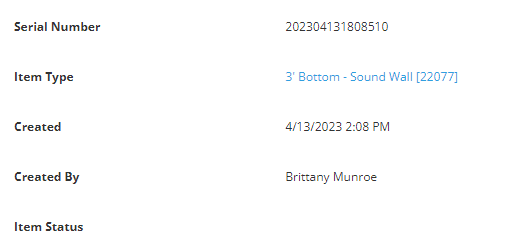
- Shipment (If the Serial Number has been added to a Shipment, it will display the Shipment information)
Custom Properties
Following the Standard Properties, each Item Custom Property that contains a value will be listed in alphabetical order. If a Custom Property exists, but the Item being viewed does not have a value for that property, the property will not be displayed.
See the Idencia Setup - Custom Properties knowledge article for more information about creating and maintaining Custom Properties.
Shipment
GPS Location
If the GPS location of an item has been captured, the Google Earth image of the GPS coordinates will be displayed in the upper right-hand corner with a pin marking the item's location. The pin is accurate to within 30 feet (about 9 meters). The accuracy of the GPS location is dependent on the GPS location services on the device used to capture the GPS coordinates.
See the Troubleshooting GPS Accuracy article if you believe your GPS locations are not appearing correctly.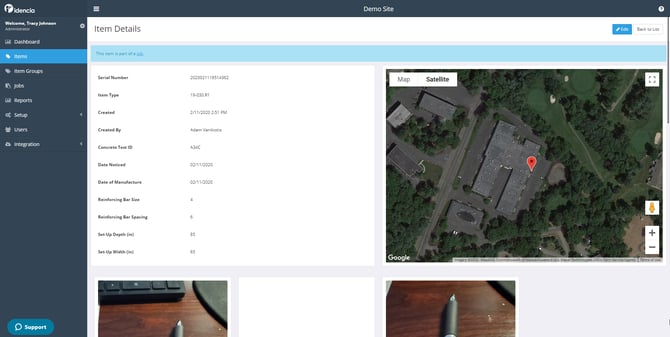
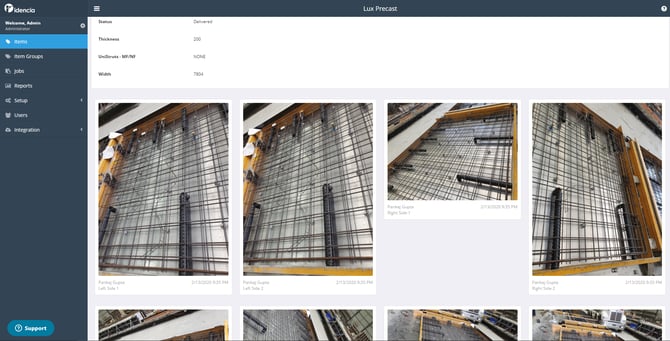
Photos and Signatures
Immediately following the item's GPS location and Custom Properties are any photos and signatures captured on the mobile device as a part of a process.
See the Process Overview article for more information.
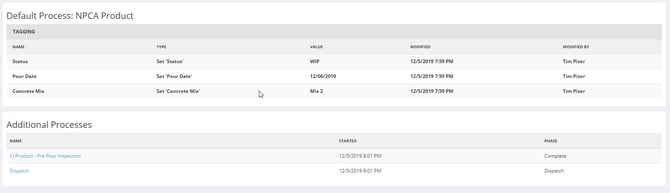
Processes
Following the attachments will be the Default Process for the Item, if one exists, and links to any additional processes that have been run against the item.
Creating Items
Most often, Items will be created using the Idencia mobile app, but there may be times where you wish to create an Item in the Management Portal. Follow these steps to create a new Item:
Create Items within a Job
- From the left-hand navigation menu, select Jobs.
The Jobs list will be displayed. This screen will show all of the existing Jobs in your database. - Click the Job within which you want to create a new Item.
The Job Details screen will be displayed. - At the bottom of the screen, click the Custom Item Type for which you want to create a new Item.
The Item Type Details screen will be displayed. - At the bottom of the screen, click New Item.
The Create New Item screen will be displayed. - Serial Number: Enter the serial number you want to assign to the item.
- Item Type: The Item Type will default based on the selection made in step 3 above.
- Click the + icon to select from a list of Item Custom Properties.
A new row and Custom Property selection list will appear.
- Select a custom property from the drop down list.
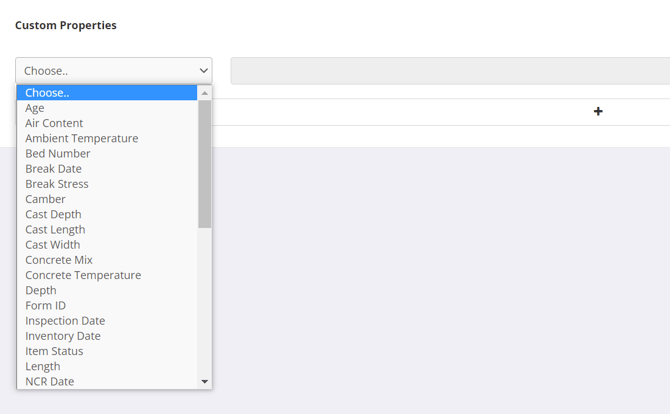
See the Idencia Setup - Custom Properties for information on how to configure Custom Properties. - Enter a value for the custom property
- Repeat steps 7-9 until all appropriate information has been entered
- Click Save. The new item will be saved.
Creating a new Item in the Management Portal will not start the Default Process associated with the Item's Item Type. Processes can only be completed using the Idencia Mobile app.
The next time the mobile application syncs, the new Item will be added to the mobile database. The Barcode or RFID tag can then be scanned, or the serial number can be selected from a list in order to start the Default Process. See Working with Items in the Mobile Application knowledge article for more information.
Create Items not in a Job
- From the left-hand navigation menu, select Items.
The Items screen will be displayed. This screen will show all of the existing Items in your database. - Click New Item.
The Create New Item screen will be displayed. - Serial Number: Enter the serial number you want to assign to the item.
- Item Type: Select the item's Item Type from the drop down list.
See the Item Types Overview article for more information. - Click the + icon to select from a list of Item Custom Properties.
- A new row and Custom Property selection list will appear. Select a custom property from the drop down list.
See the Idencia Setup - Custom Properties for information on how to configure Custom Properties. - Enter a value for the custom property
- Repeat steps 5-7 until all appropriate information has been entered
- Click Save. The new item will be saved.
Creating a new Item in the Management Portal will not start the Default Process associated with the Item's Item Type. Processes can only be completed using the Idencia Mobile app.
The next time the mobile application syncs, the new Item will be added to the mobile database. The Barcode or RFID tag can then be scanned, or the serial number can be selected from a list in order to start the Default Process. See Working with Items in the Mobile Application knowledge article for more information.
Editing Items
There may be times when you need to edit one or more custom properties for an Item without running a process. This can only be done in the Management Portal.
To edit an Item:
- From the left-hand navigation menu, select Items.
The Items list will be displayed - Click the Serial Number of the item you wish to edit.
The Item Details screen will be displayed - In the upper right-hand corner of the screen, click the Edit button.
The Edit Item page will be displayed. - Update any existing values as needed
- To add additional Custom Properties, click the + icon at the bottom of the page to select from a list of Item Custom Properties.
- A new row and Custom Property selection list will appear. Select a custom property you want to add from the drop down list
See the Idencia Setup - Custom Properties for information on how to configure Custom Properties. - Enter a value for the custom property
- Repeat steps 5-7 until all appropriate information has been entered
- Click Save. The new item will be saved.
Below are some specifics about editing Items.
- You can edit the Serial Number and any Text, Numeric, or Date Custom Property of an Item at any time. If you change the value of a Custom Property that was set during a Process Step, the current value of the Custom Property is updated, but the value recorded during the Process Step is not changed.
For example: A mobile application user completes a process called NPCA Product against an item using the mobile application. During this process, the user captures the following information:
Status: WIP
Pour Date: 08/18/2020
Concrete Mix: Mix 1
Once this data is synced to the management portal, the Item Details screen will look similar to below. Notice that the "Concrete Mix" value in the Custom Property field at the top of the screen matches the "Concrete Mix" value entered by the user on the mobile device.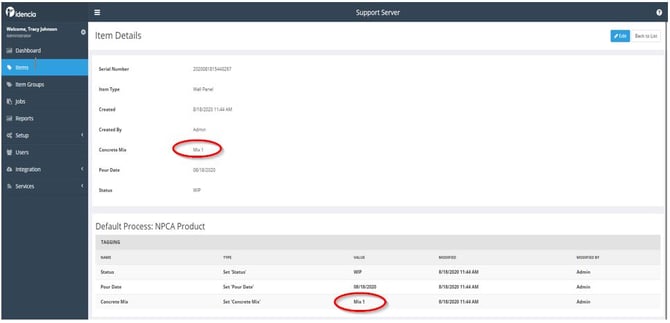
Later, it is discovered that the Concrete Mix number entered by the user was incorrect. The Concrete Mix custom property value can be edited directly in the management portal.
Using the Edit button in the Item Details screen, you manually change the Concrete Mix custom property value from "Mix 1" to "Mix 3". The custom property value will be updated, but the original value captured in mobile application will not be lost. See the image below.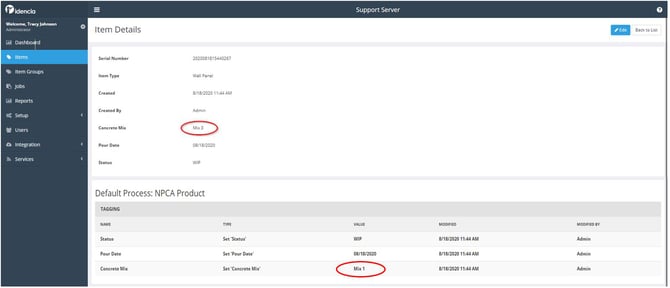
- You can edit the Item Type of an Item only if a Process for that Item has not been started. Once the first Process Step is completed, you cannot change the Item Type.
Item information can also be edited by running a process a second time, or by re-opening a process that is already complete. See the Correcting Process Data article for additional information.
Deleting Items
To delete an Item:
- From the left-hand navigation menu, select Items.
The Items list will be displayed - Click the Delete icon (X) to the left of the serial number you wish to delete.
A confirmation screen will be displayed. - Click Delete.
The item will be deleted from your database.